B6D – Outdoor Setup Guide
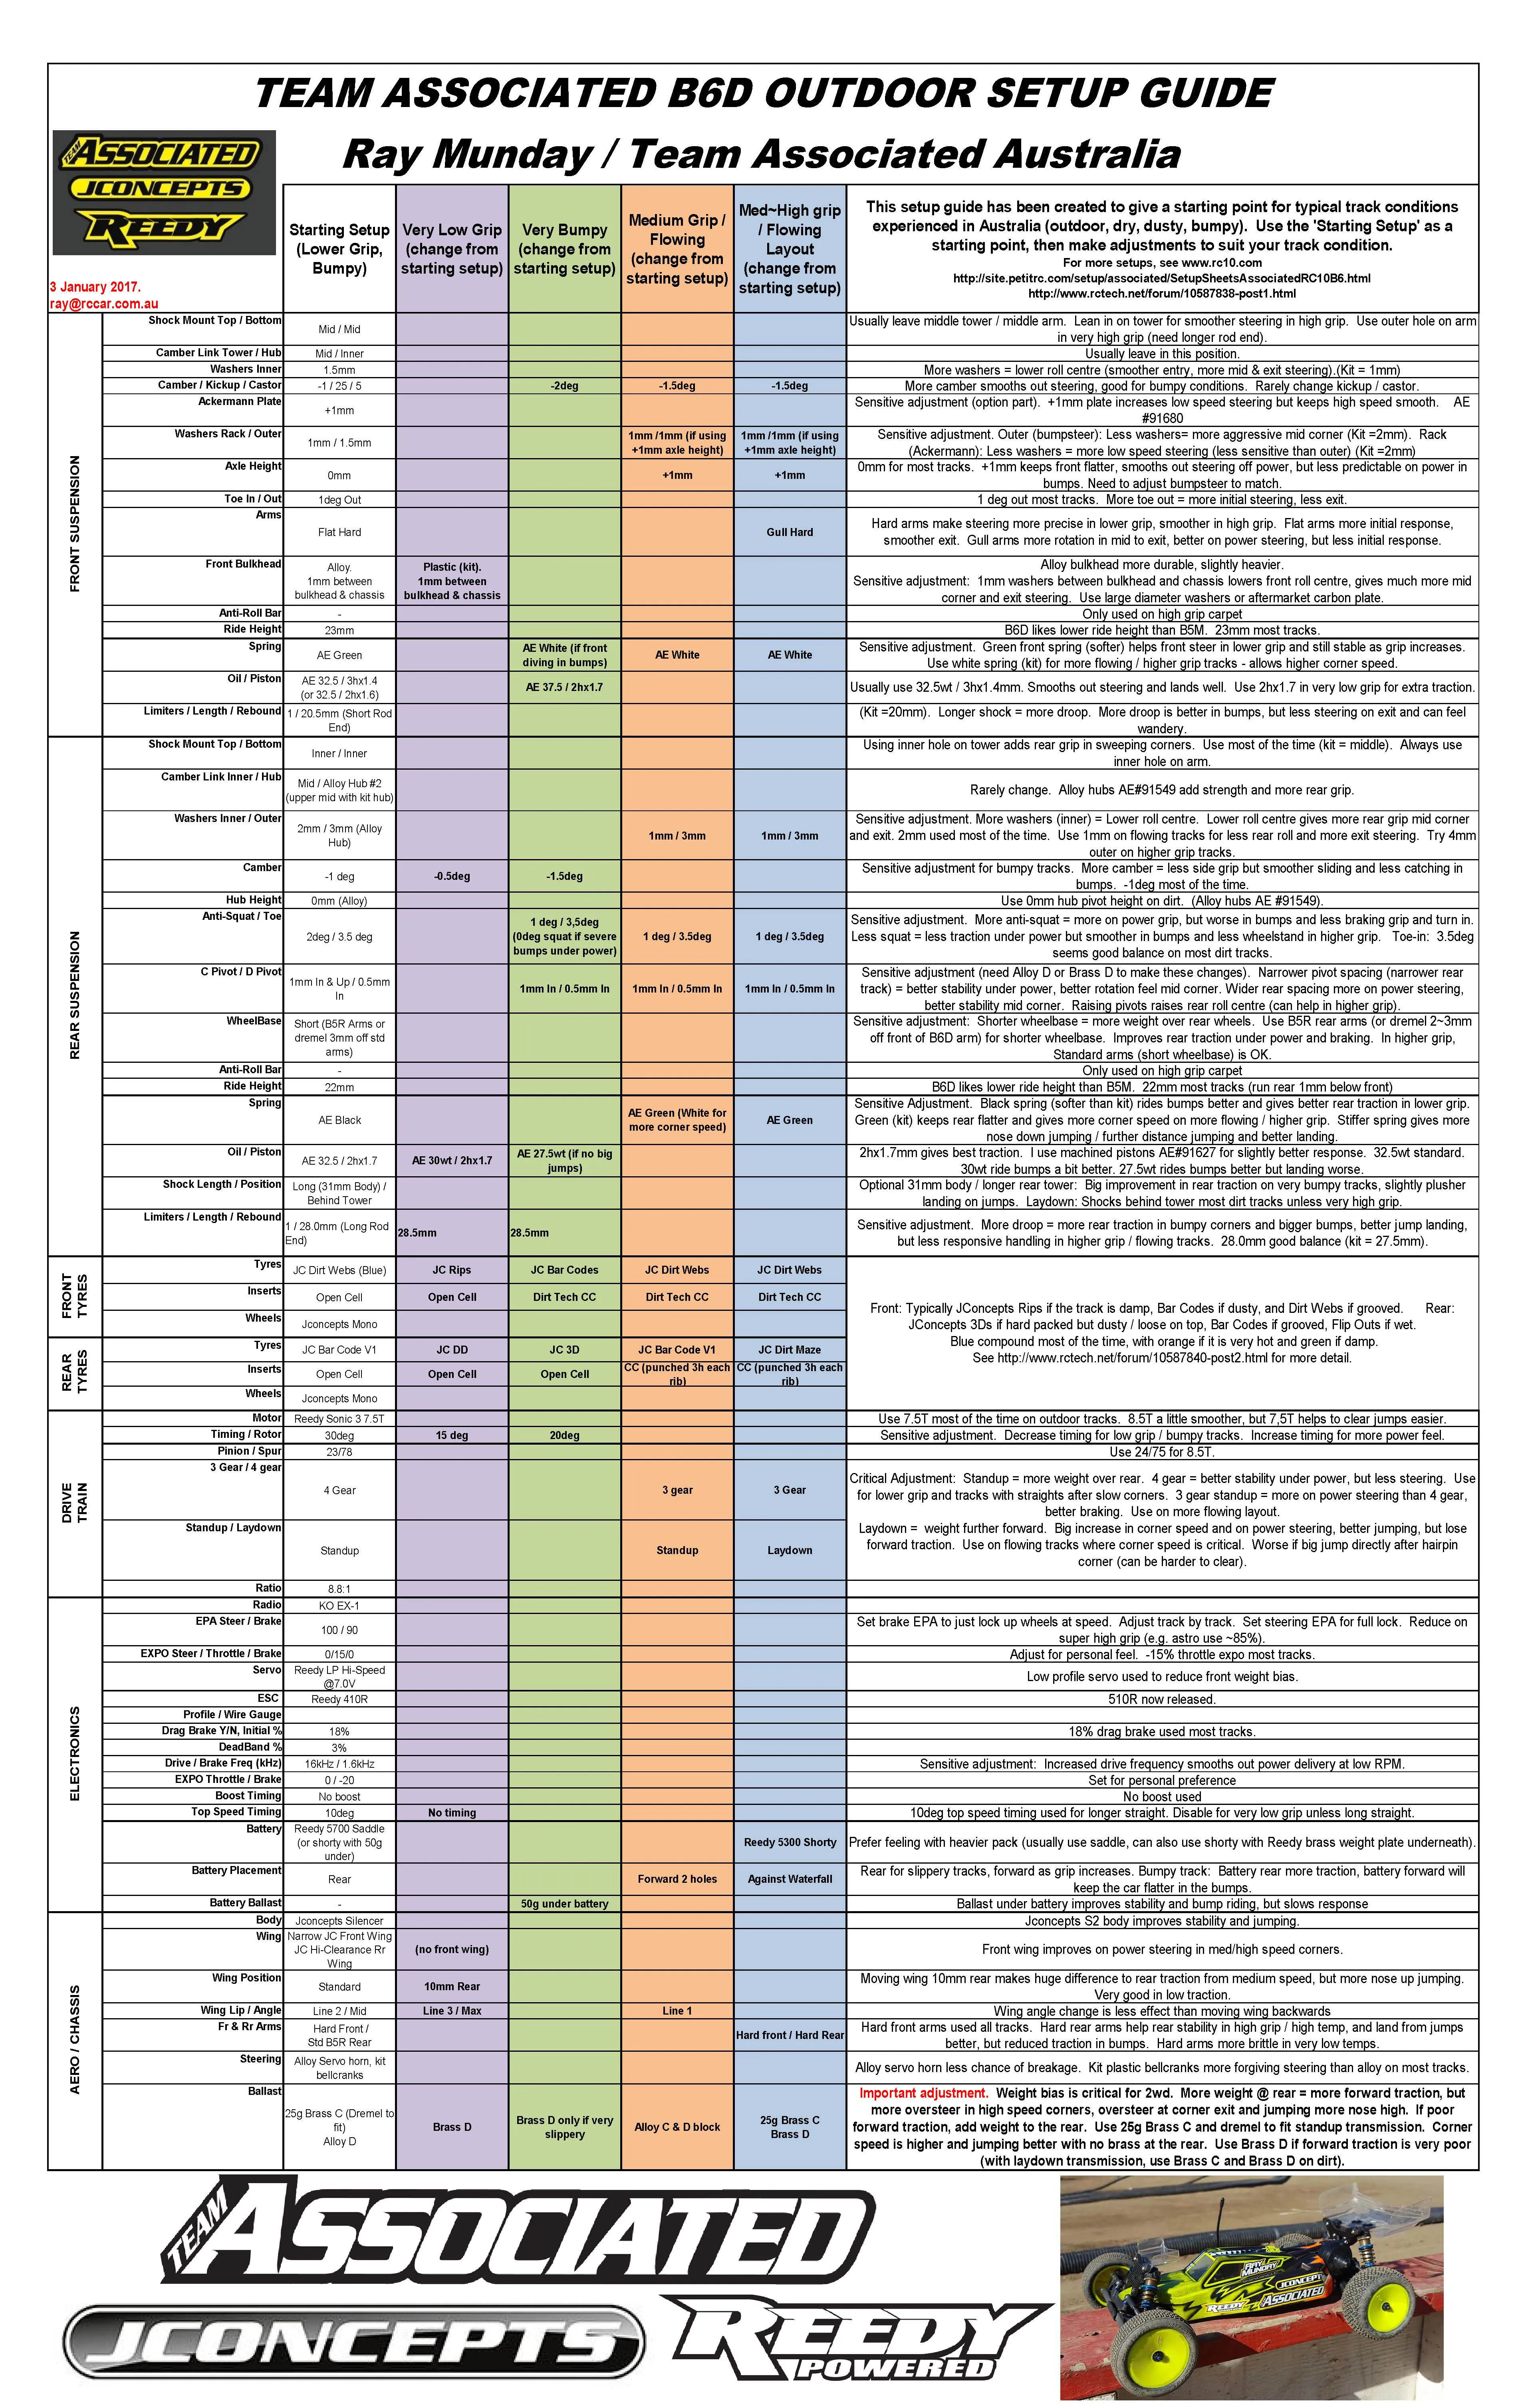
- Team Associated B6D - Ray Munday - Outdoor Setup Guide - Jan 2017
Since July, we have managed to test and develop the B6D on a lot of outdoor tracks here in Australia (I also attended the Reedy Outdoor Race @ Hotrod Hobbies with a few of my Aussie teammates). The kit setup took a little tweaking to get it working on all outdoor tracks, but our 1-2-3 at Australian Nats in 2w mod on a very rough track showed how good the car is.
Based on this testing I have put together a guide for the setups I have been using on a range of outdoor track conditions. These have been developed with a lot of feedback from my teammates, mainly Andrew Selvaggi, Mark Rogers and Matt Kellett. Thanks guys.
The B6 platform is incredibly adjustable and we are still learning all the time, but this is where I am personally at as of 1 Jan 2017. Each track is different and each driver likes a different feel, so I encourage you all to experiment from here.
I have also attached a few of my B6D setups at the bottom of this page.
Some notes:
- The 6D is lighter (about 50g) and more reactive than the 5M. Generally we are running a spring rate softer than the same conditions on the 5M. In modified I prefer the feel with saddle packs or with 50g under a shorty. If its really bumpy then 50g under a saddle pack settles the car but slows the handling.
- It seems to like 1mm lower ride height than we ran for the 5m and the rear 1mm lower than the front.
- The weight bias is a little more forward than the 5m with the servo and esc both sitting more forward. I am running an LP servo and mounted the ESC as far back as possible.
- The car comes with an alloy c block and a 12g brass D block is available as a drop in fit. A 25g brass C is available for the laydown transmission but I have dremelled one to fit the standup (final weight 23g) and this really helps on bumpy / slippery tracks. The Brass D block is also useful to get more forward traction out of slow corners on a slippery track. However any brass at the rear hurts corner speed and so on a flowing track with reasonable grip, try without the weight in the rear. My experience is that if you are having to baby the throttle to stop wheelspin, add weight to the rear. If you are having to hesitate getting on the throttle as the rear hasn't straightened up out of the corner, take weight off the rear. Also if you are severely lacking on power steering (or getting too many power wheelies) take weight off the rear.
- For lower grip / bumpy tracks I recommend shaving 2~3mm off the front of the rear arms (or using the rear arms from the B5R). This puts a little more weight over the rear tyres.
- The rear suspension inner pivots are highly adjustable (the alloy D option part is strongly recommended - the kit includes all of the pills). We are generally finding running them narrower (narrow at the C and D block) helps rear traction on most tracks and I recommend as a starting point. I like the feel with 2° squat and 3. 5 toe, however if it gets bumpy under power less squat will help ride the bumps better.
- We found running 1mm spacer (use large washers or a carbon spacer such as those made by Bezerk) between the chassis and the front bulkhead really helped the steering feel of the car. A lot more mid corner steering. A simple but effective change. I am running the alloy front bulkhead for a little more strength but if its really slippery try the plastic bulkhead.
- I use hard front arms as they give more precise steering. The flat arms give better turn in and I like them most of the time. The gull arms tend to give more steering on the corner exit and are good as grip increases or you have a lot of lower speed corners.
- Alloy steering parts are available, but currently I prefer the feel of the kit plastic parts. I use an alloy steering horn.
- The rear wing sits ~15mm further forward than the 5M. On lower grip tracks, move the wing back ~10mm and you will get a lot more rear grip from low~med speed corners.
- The 4 gear is available as an option and I like the way it accelerates hard. The 3 gear gives more on power steering and is better for more flowing tracks.
- The laydown transmission is showing huge promise on faster / flowing tracks. The corner speed is incredible and it jumps really well. The main downside is that it lacks some forward bite from low speed, so if you have a jump after a tight corner or some dusty sections it can lose time there. With the laydown, use the heavier brass C and usually the Brass D on dirt.
- The kit includes 2 lengths of shock eyelets. At the front, use the short eyelet for the middle hole on the arm (which matches the outer hole on the 5M) and the long eyelet for the new 3rd hole. At the rear, use the long eyelets when the shock is mounted behind the arm and the short when in front of the arm (only applicable for the laydown transmission).
- The longer rear shock body option (long tower and 31mm bodies) really helps rear traction on bumpy tracks.
- The front and rear hubs have adjustable height. At the front, running +1mm helps keep the car flatter and is good on faster / smoother tracks, but will become less predictable in bumpy sections. The same alloy rear hubs from the 5M can be used which I find help rear traction (slightly more weight at the rear tyres).
- Front bumpsteer seems quite sensitive. I prefer 0. 5mm less bumpsteer washer for more mid corner steering and a 1mm steering rack washer which also makes the steering more responsive from turn in.
Hope this helps to enjoy your racing!
Ray
This setup guide has been created to give a starting point for typical track conditions experienced in Australia (outdoor, dry, dusty, bumpy). Use the 'Starting Setup' as a starting point, then make adjustments to suit your track condition.
For more setups, see:
- Team Associated
- SetupCentralRC
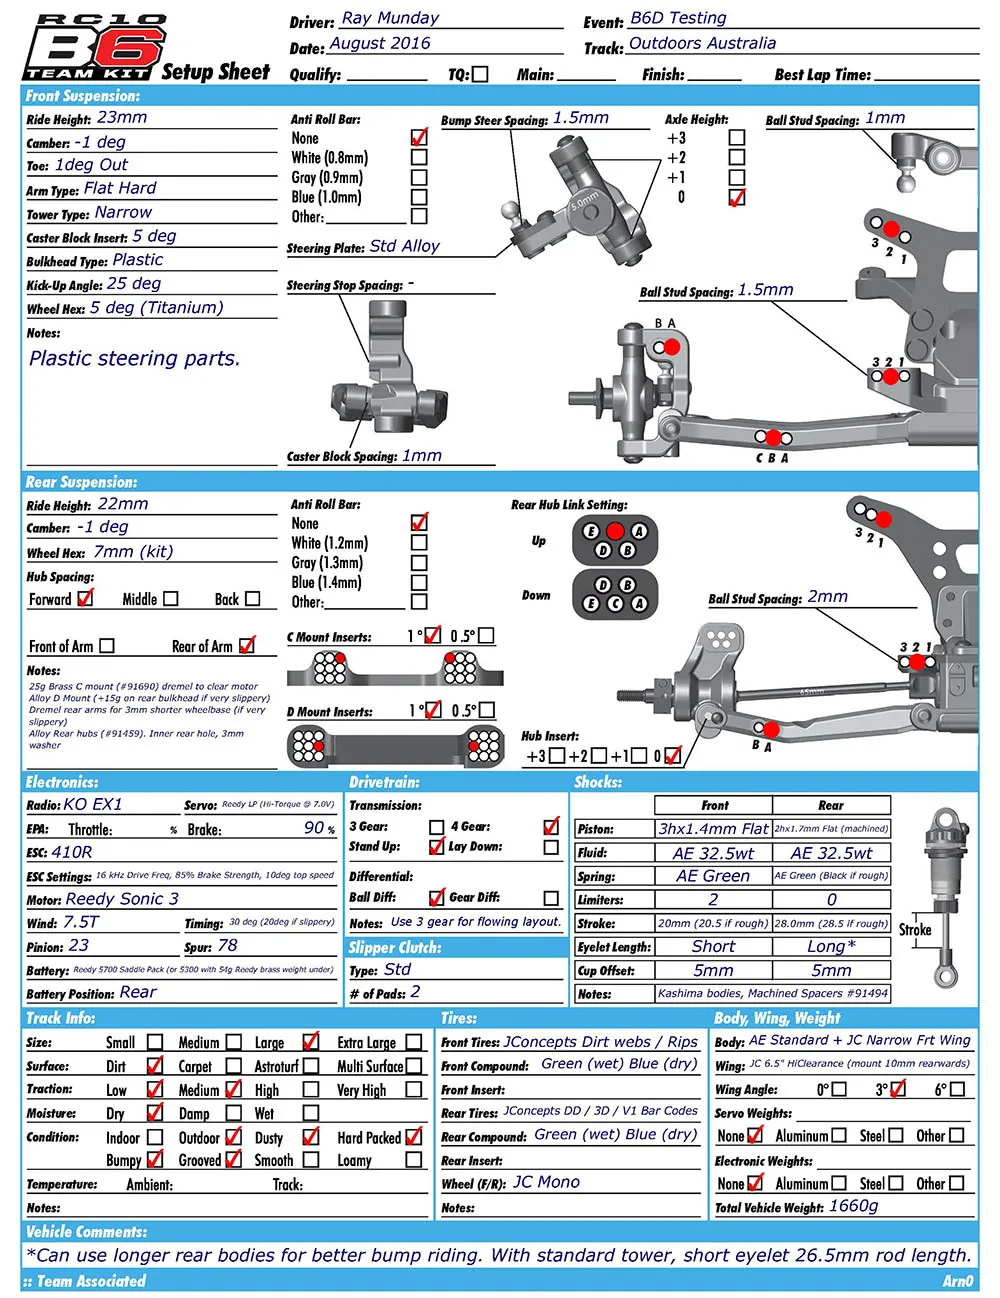
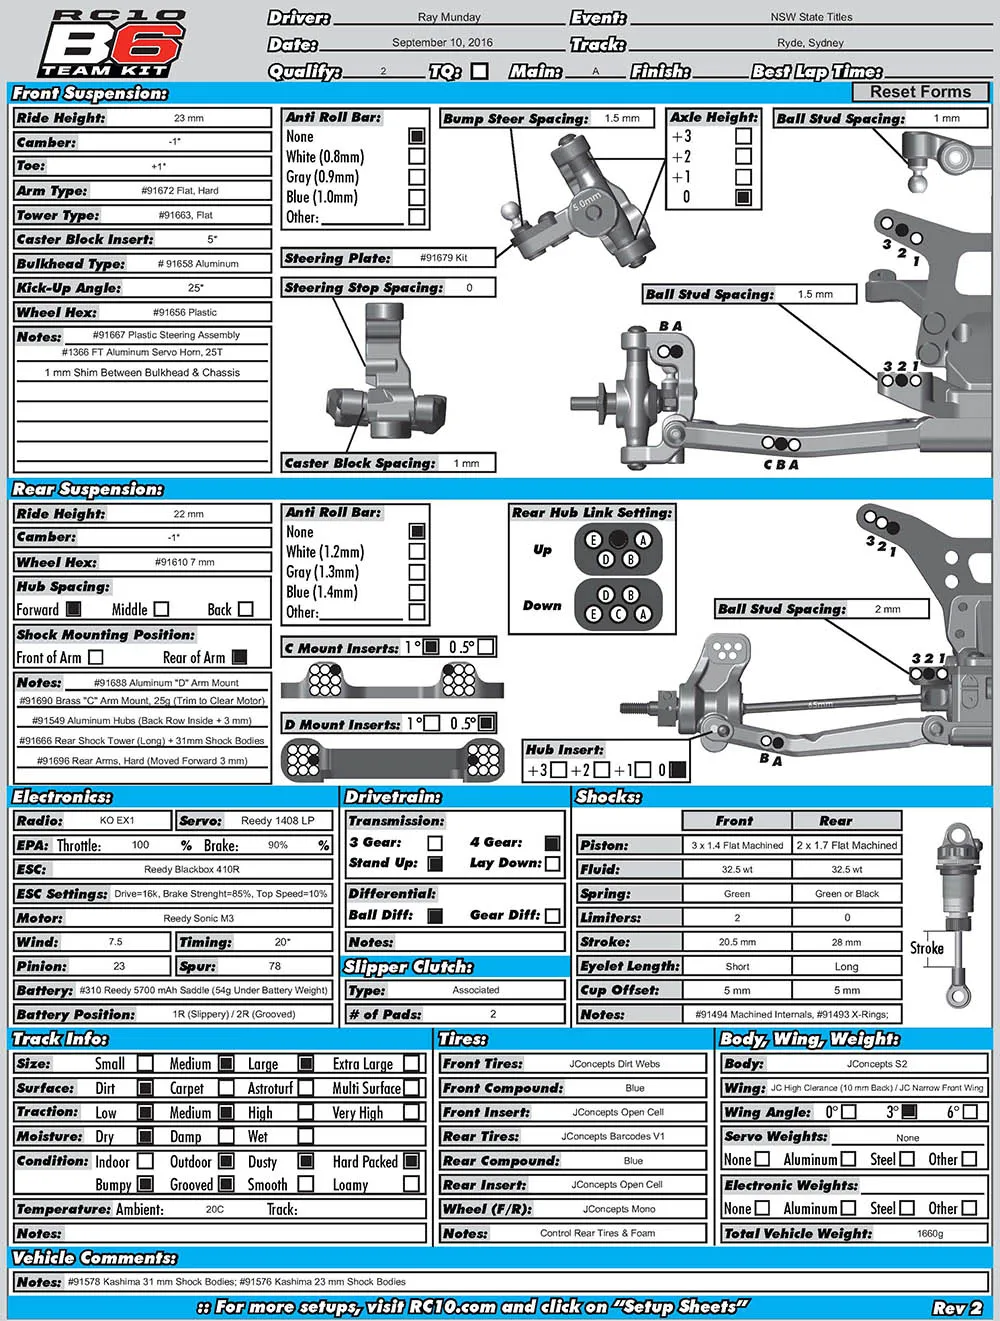
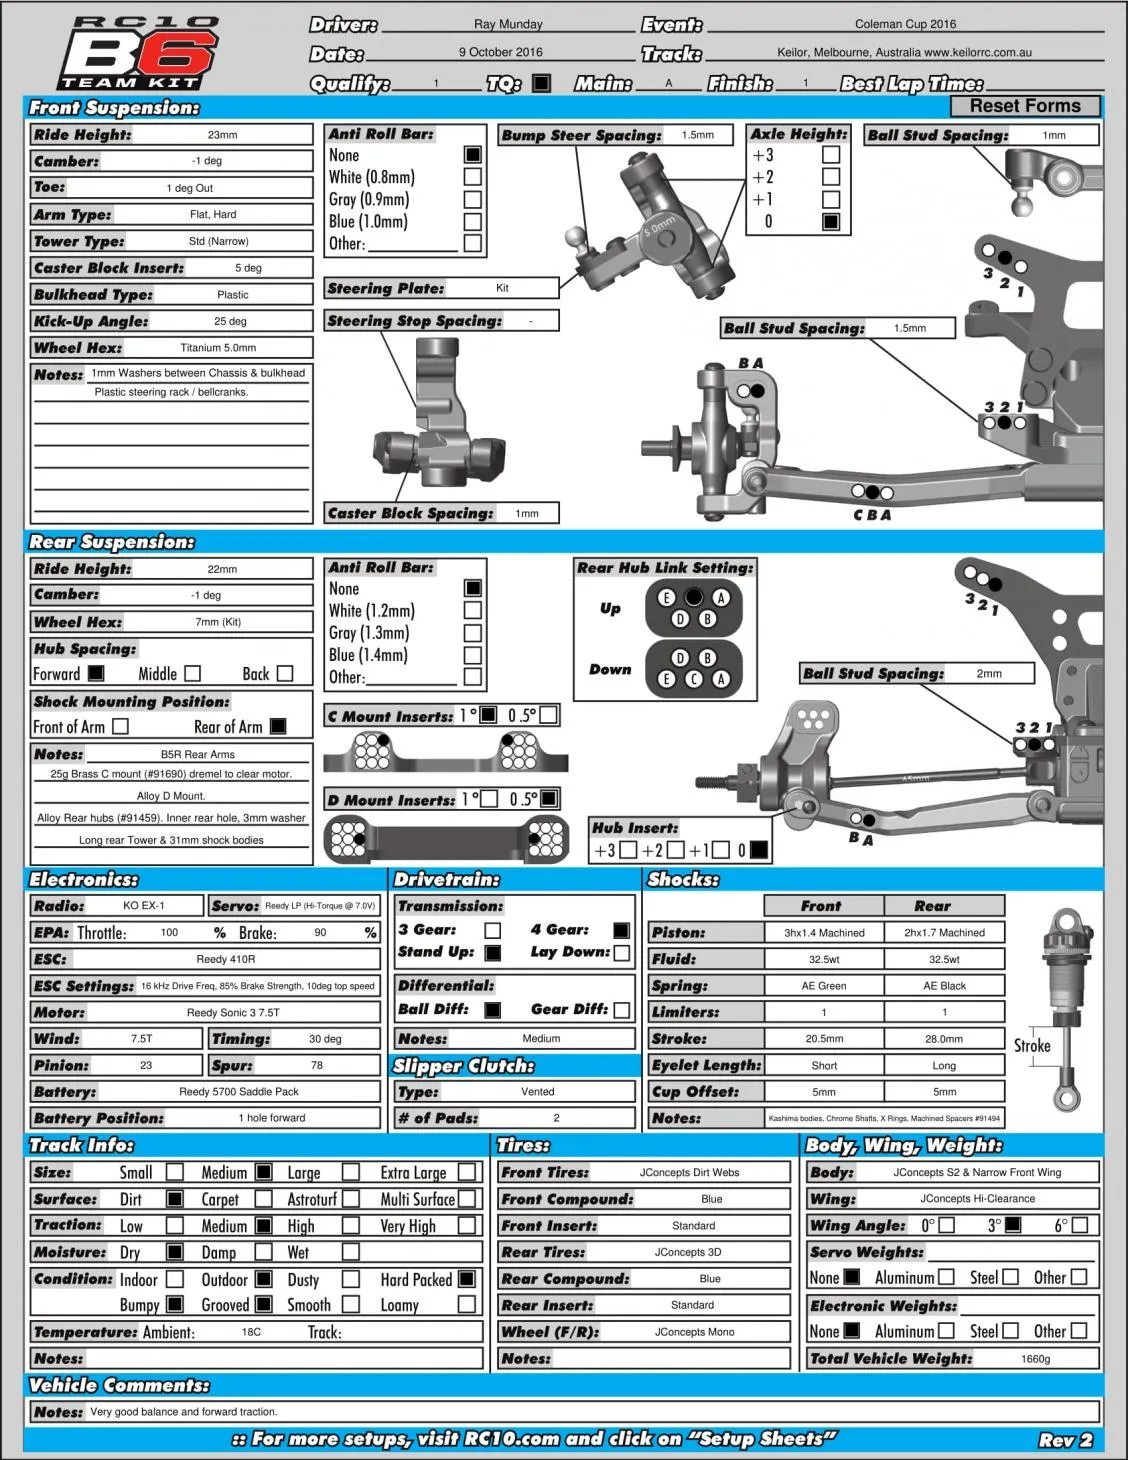
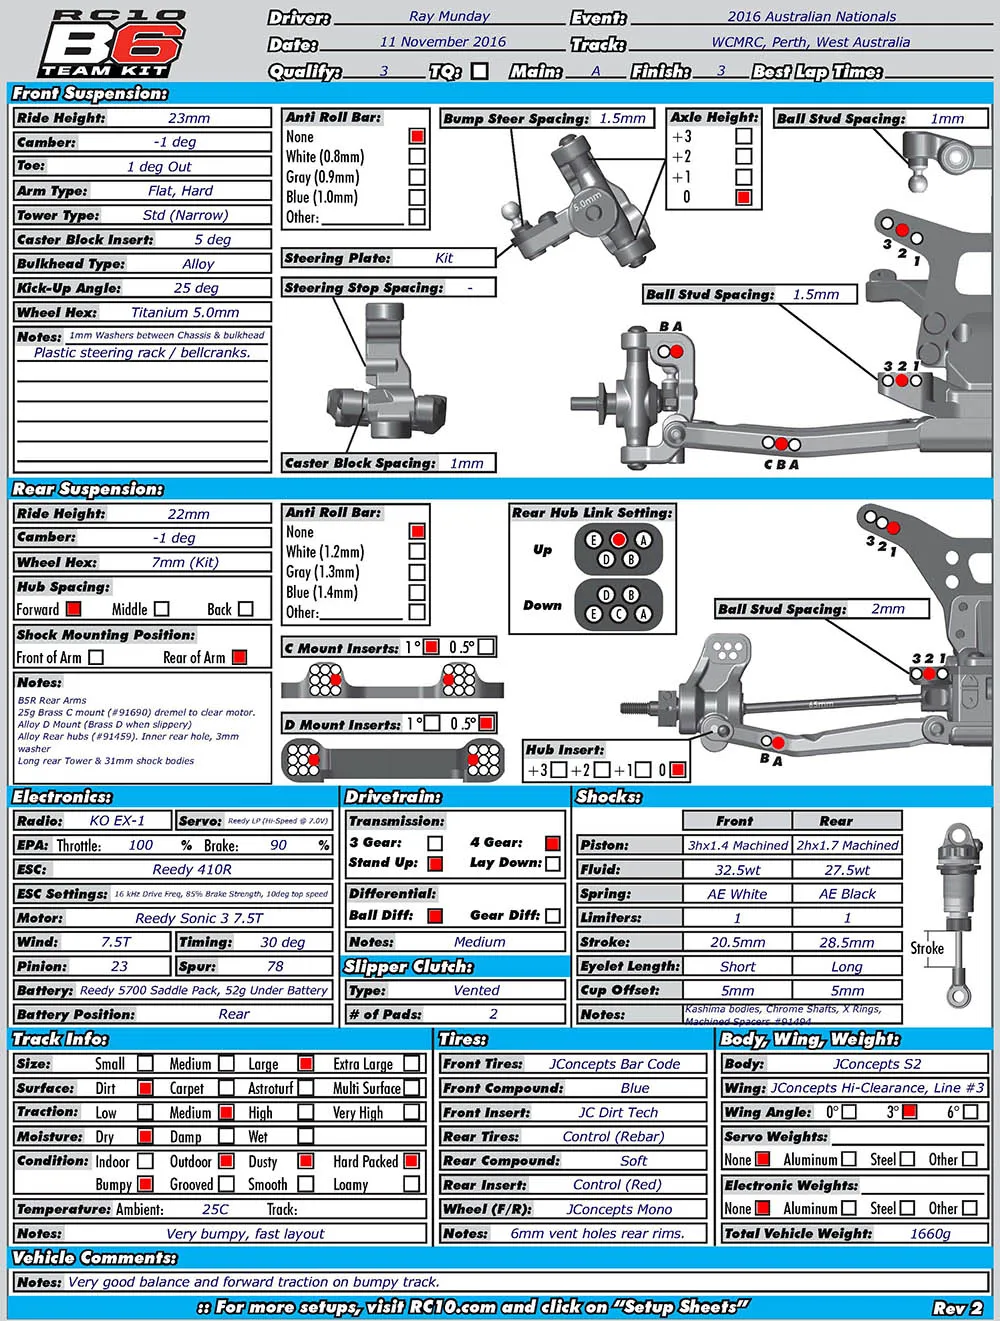
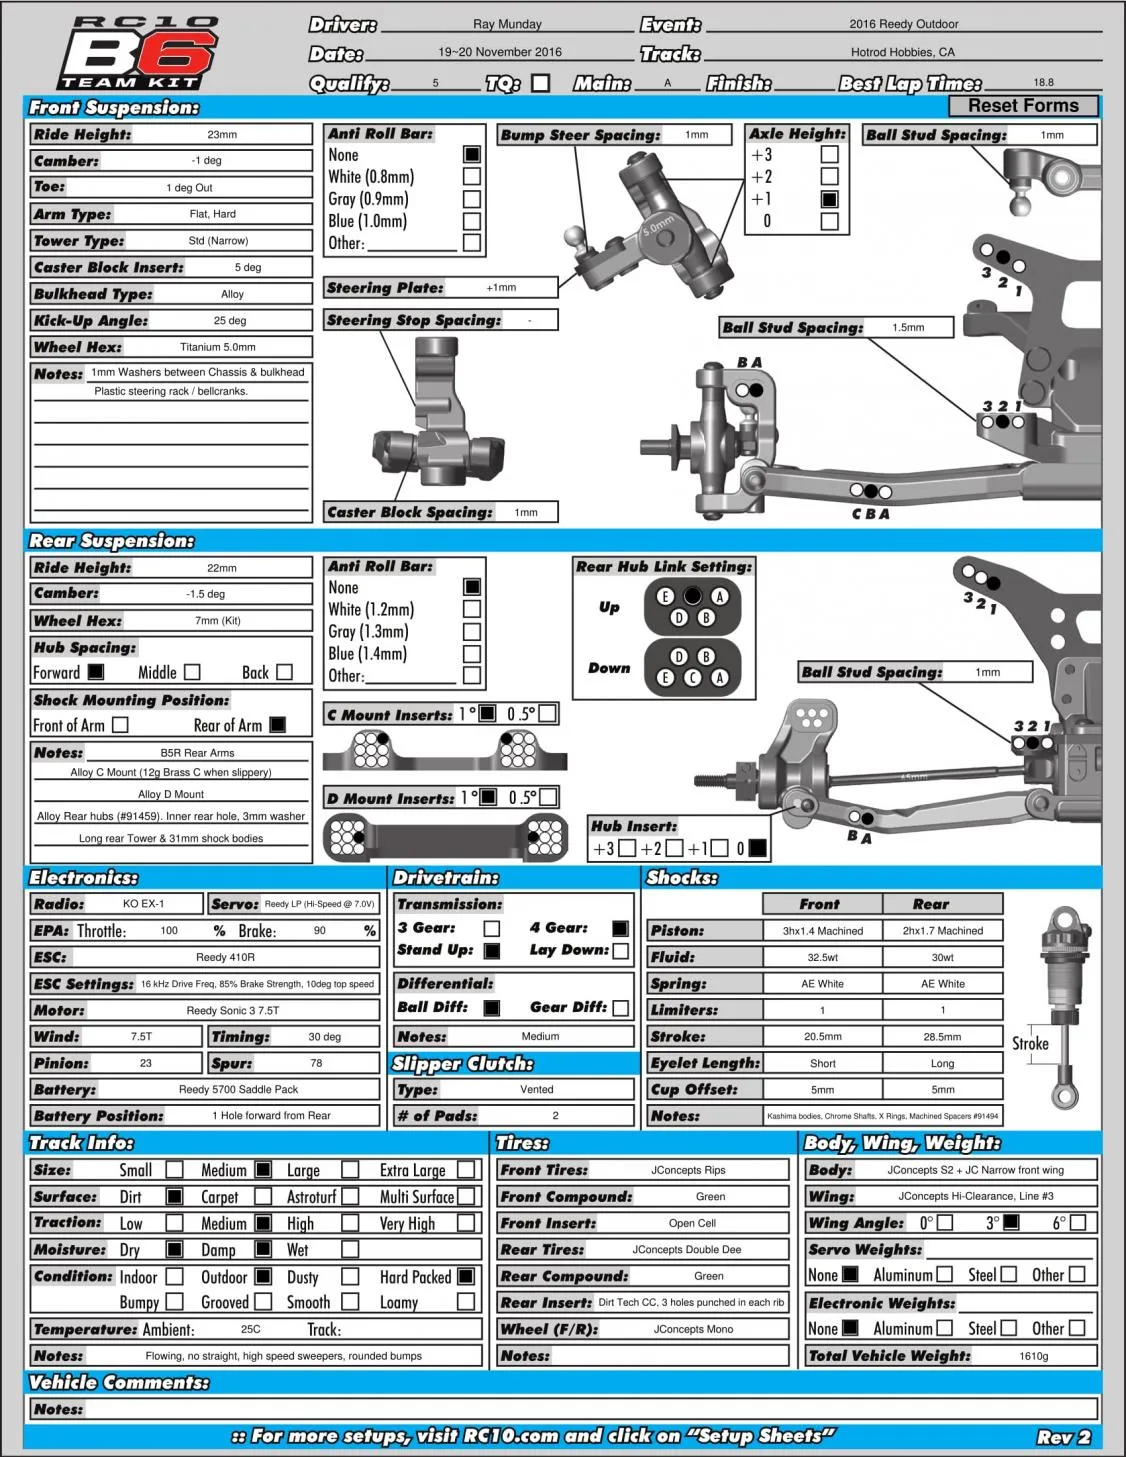
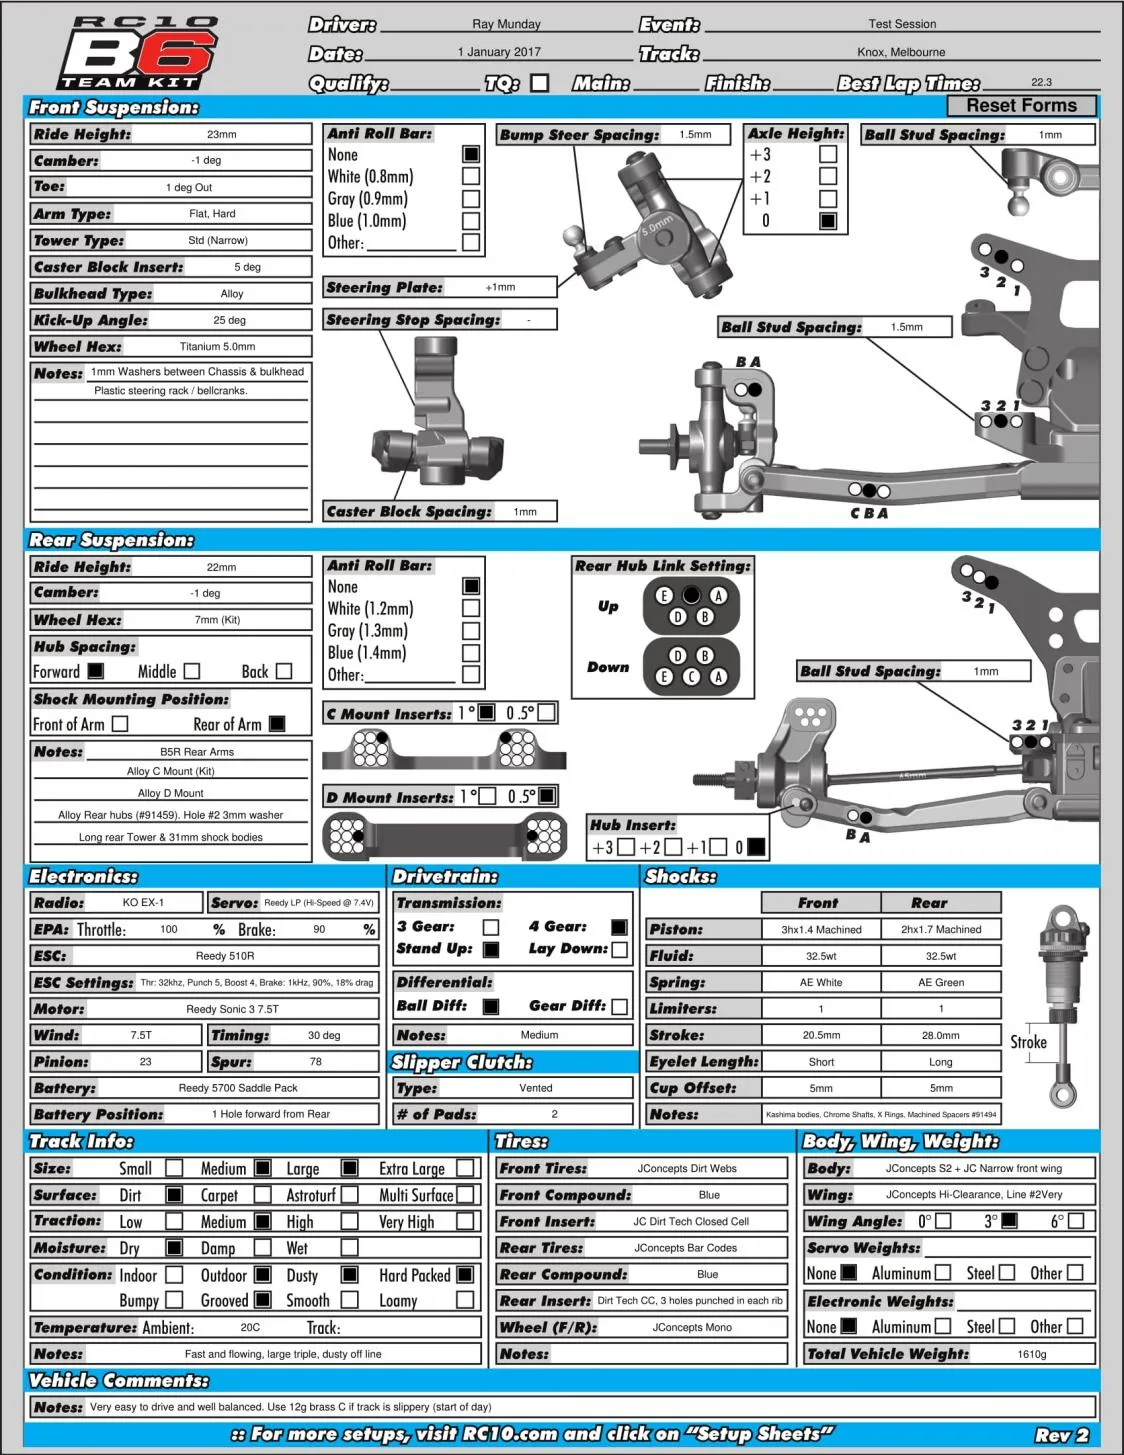
R. Munday